![]() I’m in the process if adding a new Hint feature to the Linkage program. When I was designing a mechanism recently, I had to do a series of adjustments in order to find the pivot point of a link based on two points that an end of that link would pass through. In other words, the points on the circular path of a connector are known and the center of the circle need to be calculated. Here’s how I calculated this before:
I’m in the process if adding a new Hint feature to the Linkage program. When I was designing a mechanism recently, I had to do a series of adjustments in order to find the pivot point of a link based on two points that an end of that link would pass through. In other words, the points on the circular path of a connector are known and the center of the circle need to be calculated. Here’s how I calculated this before:
-
- Add a link with two connectors.
- Drag one connector to the start location of the movement.
- Drag the other connector to a guessed location for the pivot.
- Add a point where the movement of that first connector should end. Note that the movement could go past that point or stop short if the driving mechanism is not setup correctly.
- Add a point and drag it somewhere between the first connector and that other point. There are now three elements roughly lined up.
- Select the three elements in order they appear in a line and use the “Even Spacing” feature.
- Select the first connector, the second point (centered between the connector and other point), and the other end of that link. The other end of the link is the pivot point.
- Use the “Right Angle” feature to move the pivot point connector to the right location.
- Select the center point (in that line of connector and two points) and then select the pivot connector of the link.
- Set a distance in the tool bar to adjust the radius of the curve that the end of the link will follow.
What a pain in the ass. So I added a “Perpendicular” feature that does much of that for me. Now the steps are this:
-
- Add a link with two connectors.
- Drag one connector to the start location of the movement.
- Drag the other connector to a guessed location for the pivot.
- Add a point where the movement of that first connector should end. Note that the movement could go past that point or stop short if the driving mechanism is not setup correctly.
- Select the end connector, the point, and then the pivot connector of the link. Use the “Perpendicular” feature to move it to the correct location.
- Do steps 9 and 10 to adjust the radius.
It’s still going to take steps 1 though 4 to add the necessary elements but steps 5 through 8 have been reduced to a single operation.
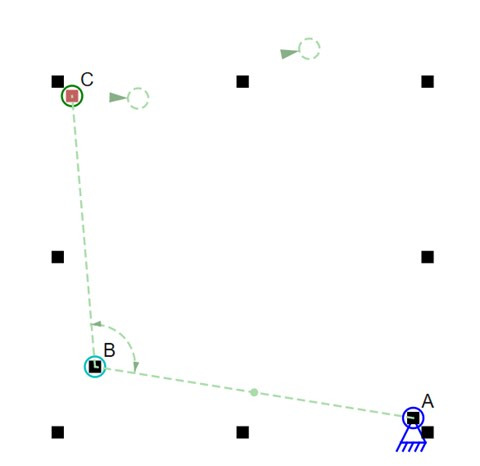
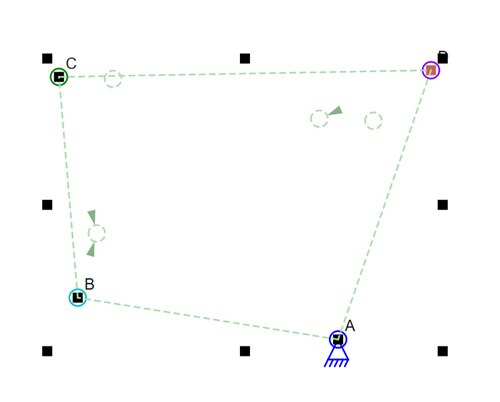
Now for the visually interesting part of this; I added hints for the various features that are available for selected elements. The Linkage program already had a few hints, like the one where four selected connectors get a hint circle drawn where the second and third selected connectors would meet if rotated around the first and last respectively. Now there are a bunch of hints as seen in the following two pictures.
Hints for Three Selected Connectors
The circle and arrow closest to C shows where C will go if the “Right Angle” feature is used. The further away circle shows where C will go if the “perpendicular” feature is used. There is a small dot at the midpoint between A and B to show a hint about how the “perpendicular” feature uses the midpoint of that line. The old hints that show that angles can be set, and that the angle is also shown in the tool bar, are still there.
Hints for Four Selected Connectors
For four selected connectors, the hints are shown for the “Meet”, “Rectangle”, and “Parallelogram” features. The circles with no arrows are for the rectangle. The circle with one arrow is for the parallelogram, and the circle with two arrows is for when B and C are rotated to meet each other.
Now for the really clever part. I’m writing code to do these operations when any of these circles is clicked! The most important design paradigm in the Linkage program is the reduction of clicks to accomplish common tasks. These are not totally common tasks but reducing the clicks to open the “Align” menu and select an alignment feature makes a big difference when doing a lot of these.
I also added the “H” key as a shortcut to turn on and off the hint lines and circles.
I hope to release a new version of the Linkage program in a week or so. It needs some testing before a release and I don’t have a lot of time at the moment.


