

Tapestry is a new board game by Stonemaier. It is a civilization-building game that involves exploration, scientific research, technology advancement, and military conquest. I wrote about it recently and in this post, I’m going to explore (no pun intended) some ideas about optimal gameplay.
Tapestry has four advancement tracks: Exploration, Science, Technology, and Military. Each player has four different types of resources: Food, Workers, Money, and Culture (mushrooms, dudes, moneybags, and stars) and these, after the first few turns of the game, are related to the four tracks. My goal here is to describe some ideas about optimal gameplay where there is just a single-player playing as optimally as possible. I am likely to completely miss some clever tactical or strategic move, but I hope to at least show that a board game like Tapestry can be analyzed and some sort of optimal play can be calculated.
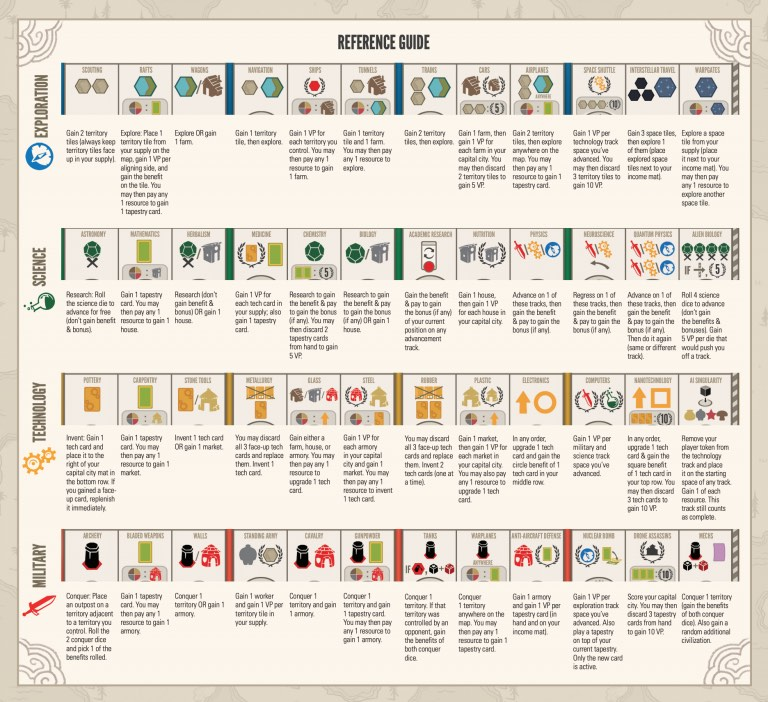
Above is the reference guide to Tapestry. Not shown here are the costs to progress on the various tracks; Those costs are printed on the game board itself. This reference sheet describes more details about the various track locations.
The game board shows that a track always requires a resource cost and that sometimes includes a resource specific to the track, to advance forward.
One other important component is the player capital city map. The capital city is a square grid with some spaces marked with red dots representing unbuildable terrain. The unbuildable terrain counts towards filling a sector, of which there are nine, so they really only take effect when placing the large landmark buildings available in the game; The landmarks have a large and sometimes interesting shaped footprint that effects where it can be placed on the capital city map.
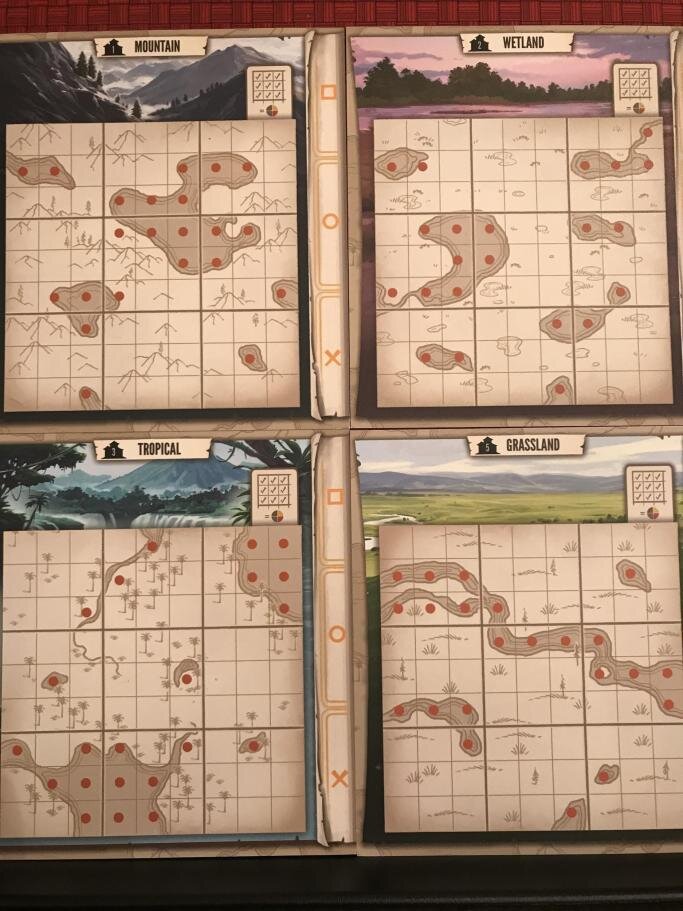
Four of the capital city maps are shown above. It is worth noting that not only do the placements of the red dots vary between the boards but so does the number of dots in the various sectors. In Tapestry, the small squares get filled individually with small income buildings (read more in my recent review of the game) and a landmark can be placed on this map to cover multiple small squares. Which map you get is critical to one of the strategies I describe later.
The Exploration Rush
My first bit of research into optimal gameplay comes from my frustration at losing at this game many times to a better player. I wanted to know how this better player gets longer eras and more resource production than I do. I think that this better player figured out what to do by simply observing the game board looking for optimal moves during play. I am a little slower and had to do some experimentation.
My optimal strategy involves getting as many income buildings into the capital city as quickly as possible. I cannot figure out how to get more than two buildings onto the capital city map in the first era (before running out of resources) but I did figure out how to advance fairly far on a track and to get a landmark in the process.
The Exploration track rush strategy requires that the player have one of a specific set of capital city maps. The mountain map is not going to work but the wetland, tropical, and grassland maps, will all work fine. The good maps have at least one sector (one of nine 3×3 square areas) that has just three empty small squares. The maps that don’t have this, and only have sectors with four or more empty squares, will not do. And now for the strategy:
- Pay 1 non-mushroom resource to advance on the Exploration track. This yields 2 more hex tiles so there are three to choose from. If none of them have resources on them, this strategy won’t work!
- Pay 1 non-mushroom resource to advance again on the Exploration track. This lets the player place 1 hex tile which should yield 1 resource. The cost of this turn is, therefore, zero resources!
- Pay 1 non-mushroom resource to advance yet again on the Exploration track. Take the building since buildings represent production and more production is better (I think). This building must be placed on the capital city map on a space where the sector has only 3 empty squares. it is also important that the other two empty squares are on the edge of the map or are next to 2 more empty squares in an adjacent sector. The next move shows why that is important.
- Pay 1 mushroom resource and 1 other resource (all that are remaining) to advance one more time on the Exploration track. With the 2 remaining hex tiles and the new one that is drawn, there must be a tile with a resource on it for this to work! Place the hex tile and get the resulting resource on it. Also, take the landmark building and place it over the 2 remaining squares on the capital city map on the chosen sector (the one that had 3 empty spaces and no more). The resulting cost of this move was zero resources.
- Pay 1 resource to advance on the Military track. Place the player tower token on one of the two placed hex tiles and roll the military conquest dice. One of the dice will yield a specific resource or maybe yield a resource that is on the tile being conquered. It is important to conquer a tile that was just placed in order to ensure that a resource is gained. The cost of this move was, as is most optimal, zero resources.
- Take the 2 remaining resources and pay to advance on the Military track again. This is the only way to get another income building onto the capital city map before running out of resources.
At this point, advancement has gone well and the player markers have been moved to the fourth space on the exploration track and onto the second space of the Military track. There are two income buildings placed in the capital city and therefore two more resources gained during production. A landmark was gained and that means other players can’t get it.
Strategy from this point on is trickier. The players chosen civilization will give benefits that affect what is the best next move. The player will also have two different Tapestry cards and those can have wildly different benefits, some great and some terrible.
I’ll post again if I can come up with a next move. Something to keep in mind at this point in the game is that the next build gained form the Exploration track or from the Military track will not increase production. Getting a building from the Science or Technology tracks, or one of each is a better move. Again, the player’s civilization and Tapestry card might affect what happens next in a big way.
Dave
[Edit] I was giving this some more thought and it came to me that since a player can upgrade a tech card during the income turn after running out of resources, and since that tech card can have a resource on it, getting a tech card instead of the building from the Military track could be almost as good a turn near the end of the first era. It takes two resources to get the building from the Military track but only 1 to pick up a tech card. Still, the building could be more important since it is needed eventually. But the tech card and being one space further on the tech track might be good options for a strong start to the next era.